Hey guys!
I hope you are all doing well, especially through these unprecedented times. I really hope that you have all been able to be fruitful during lockdown, and as for me, I would like to share a couple of animation things that I have learned through this period.
Before Lockdown started, I had made plans to learn as much as I could and develop my skills as an animator. I had purchased Yuri Lementi’s Animation Box programme, signed up for Marlon Nowe’s AnimSquad Expert Workshop, and discovered that Ken Fountain had added a load more tutorials at Splatfrog.com.
I scoured a load of other online resources, including Sir Wade’s youtube channel, Eddie Chew’s Griffin Academy live sessions, and Blue Zoo’s AnimDojo, which had generously been free throughout lockdown.
All of these are great resources that you should definitely check out if you want to up skill your animation work!
I just want to take this opportunity to share my latest animations and a couple of insights I have gained during this time.
WARNING! This is not an animation tutorial in the sense of how to get timing and weight correct, but a couple of principles I have found deeper than that! I am also writing these down as a way to cement the ideas in my mind and use as personal reference later. If they help you, then that’s amazing also!
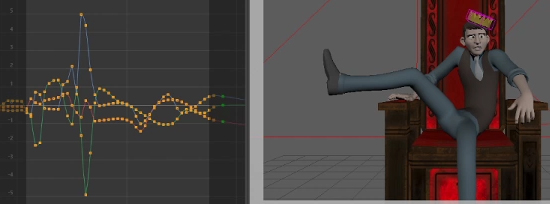
This animation was a super fun, super cartoony shot, and my first shot for the AnimSquad workshop. From this, I want to point out four key points.
1 – What is Leading, what is Following?
I remember an animation director once telling me that he could ‘see’ my keys when reviewing my work. What he meant was that my actions all tended to start and end on the same frames, splined together. And, man, it was ugly.
So… say you have two key frames.
These are Story-based keys (which is to say they describe the story of the piece) and not Animation-based keys (which is to say how the how the movement flows – a breakdown).
Lets say a teenage girl looking at her phone – first key. She is then distracted by something behind her and turns to look – second key. We have 20 frames to fill.
Now, if all body parts start moving and ending at the same time, even with anticipation and overshoot, this would look robotic. As humans, we don’t move this way, we tend to lead with certain body parts, getting them into position, then allow the other body parts to catch up.
And why?
Because all human movement is motivated by emotion.
So what does this mean? Well we should figure out, what emotion is motivating the movement and then separated the body parts to start and end at different times in order to relay this emotion.
In my example of the girl and her phone, how would the movement read if her body moved before her head her head moved before her body?
Well, if her body moved first, and then the head, it would suggest more of an interest on whats on her phone, and really not bothered about what’s going on behind her. She’s looking at her phone until the last moment. We would probably get the body into position by frame 5, keeping her head looking down. Then she finally looks up.

If her head moves first, then the body, it suggests that she is more concerned with what is behind her. The head – being the describer of the individual’s attention – looks up quick, and her body then comes into position after. This could suggest she is shocked by whatever it is that made the noise.

This is basically the idea of overlapping actions, but in a way I had never considered before, and it really helps the movement feel good, flow, and convey emotion.
2 – Separation is a great thing!
So what we have with Leading and Following body parts is separation. And separation can be used with great effect when animating a cartoony shot.
Because of the dynamics of timing and spacing used in this shot – the fact that some movements are super chill, then super fast, then super chill again – I could really use separation to a high degree.

There are parts of this animation where the body moves, but the head lags behind, stays in position before following. And though it might not be physically accurate, it is more appealing to see than if everything was connected – it’s more organic. It also gives us the ability to perform very quick movements without confusing the audience, allowing the audience to recognise a pose before moving on.
3 – Blocked Vs Layered
Now this is all keeping in the same ballpark at the moment. With Lead/Follow and Separation, we aren’t considering the story-telling poses themselves, but how our character is moving from one to the other. This is the idea of adding breakdown, and there are two main approaches to this: blocked and layered.
The blocked approach is the one I am used to. Your keys are set to stepped and you will key all controls on every other frame if you have to (this is called ‘animating on 2s’ – the idea that you leave nothing to chance and sculpt your pose every 2 frames).
This gives a LOT of control over your animation, but you end up with a billion keys that might not work as you had hoped when you go into spline. Therefore, you’re gonna spend a LOT more time polishing your animations, getting each key to behave how you want in relation to it’s neighbouring keys.
This is the approach I am more used to, and tools like Animbot really help here. But the Layered approach seems more fun and free.
Simply put, the Layered approach is like a mix of pose to pose and straight ahead animation. You have your two poses to want to transition between, now you animate straight ahead to get those breakdowns. Nothing is on stepped, everything is on splined, and you grab and move and twist your controls, keying them wherever you like, with no regard to the keys of the other controls.
This seemed really alien to me – and still does – but if you start from the hips and radiate out, you can create some really fluid motions quite quickly, and means that you don’t have to spent as much time in polish as you would with the blocked approach – the polishing is almost part of this method!
This is something I will be striving to incorporate as part of my own workflow, but this will take a lot of time and a lot of practice! So wish me luck!
4 – Re-shoot Reference and Draw Overs.
Let’s change the subject and talk about reference for a moment.
For the most part, reference is meant to be just that, reference. It is not meant to be rotoscoped so that each frame is matched exactly (unless, obviously, that’s what you’re going for), but is there to influence your ideas of key attitudes and little flourishes you may not have considered if you’d just animated from your imagination.
With this in mind, there were a couple of points through this shot where the animation just WAS NOT WORKING. No matter how close to the reference I tried to get it, the movement just looked wrong and ugly. I spent days trying to get one thing right and to a point where it would do, but I wasn’t happy with it.
After having the opportunity to consider what actions I really wanted, I reshot the reference to suit. I reanimated that section and polished it in no time!
It really made me think; there is nothing wrong with re-shooting reference, and would save time in the long run if you’re not happy with what you have.
Obviously there are some movements that work really well in animation, but impossible to shoot reference for. For me and this shot, it was the stylised, arcing arm movements during those fast moments.
I had a plan in my mind – had even drawn out some pencil tests – but getting them to work in Maya was a nightmare! I spent ages posing these movements in Maya, often frame by frame as they were so quick, and still they didn’t work.
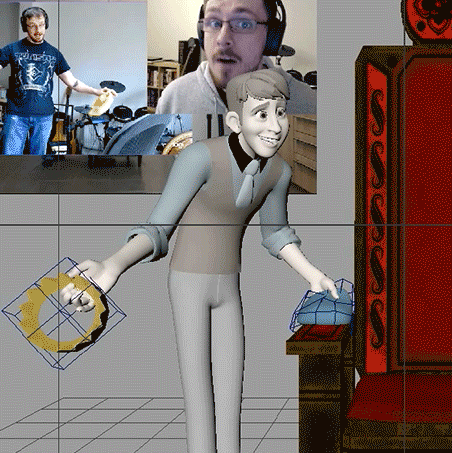
Then it struck me – why spend so long posing when you could do a simple draw over in a fraction of the time? So I made a playblast of the section I was struggling with, got it into a fresh scene (as an image plane), and used grease pencil to sketch out how I wanted it to look. It took me a fraction of the time it would have if I had posed each frame, and allowed me to get a better sense of how the movement would look sooner.
Once I was happy with it, I brought it back into my scene and posed to the sketches.
This worked so well, and saved my so much time! I would definitely recommend doing a quick draw over, frame by frame, using Grease Pencil or SyncSketch if you are struggling with a quick and cartoony movement!
Ok! So there are my thoughts, the first part of my Lockdown Up skill blogs. I hope this has been an interesting read, and possibly helped you in your journey to up-skilling your own animation.
Cheers for reading! See you next time!
Oz
