
Morning All!
So recently I have finished a short personal project; an animation based on one of Riot Game’s League of Legends Cinematics. A New Dawn was released in 2014, when I was still a young and impressionable CG generalist exploring a career as an animator. Needless to say, the animation blew my mind, and these sort of high-end cinematics have since been a massive inspiration to me.
Recently I have found myself between projects at work and decided to use this time as productively as I could; expanding my skillset as an animator, and learning a bit of UE4 at the same time. This seemed like the perfect time to learn from one of my favourite pieces of animation!
In this series of blogs I am going to outline a couple of the processes used during this project, looking at:
First, however, I need to give a massive shout out to Dan Eder who created the Psylocke model and TruongCG who rigged her up! Also another shout out to the guys who made Advanced Skeleton, who created the rigging system used. Having played around with the Psylocke Rig I was impressed by how versatile it was, but when I actually checked out the system used to make it, I found a load more tools like control selectors and such. Great Stuff!
Animation
The reason I love this cinematic is the energy and fluidity in the motion. The way the Animation team at Riot have been able to mix the realistic and unrealistic animation styles, merging really exaggerated movements and smear poses into a really detailed and believable world. I edited the cinematic down to the pieces I wanted to animate and used a great piece of software called Keyframe MP to help me flick through frame by frame, set keys at those storytelling poses and generally keep on track with my reference.
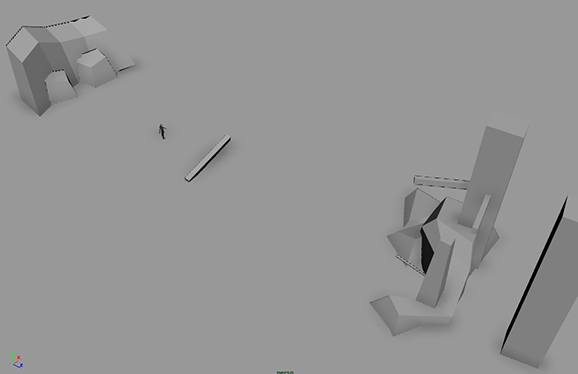
My first action was to proxy out the environment. At it’s most basic level, the character is bouncing around an obstacle course, and so I needed to estimate heights, shapes and positions from my reference. As you can see, the Psylocke character is pretty small in the environment.
With this done, next was just a case of jumping into the animation. I had watched the cinematic time and time again, getting an understanding of how the motions worked. Using Keyframe MP, I identified the most important poses, the extreme poses that would sell the story of the movement and truly convey the motion.
And, without an ounce of remorse, I shamelessly copied.
This was a test in discerning the reference. In the original cinematic. There are a lot of things happening that would confuse the eye. going through it frame by frame definitely helped, but not where effects or motion blur got in the way – and that didn’t come in small doses. There were many times when I had to flick between five or six frames to get a decent enough idea of what the key pose in the middle was.
Because I had given myself a short deadline, I wanted to focus on one character and one character only. Looking at the reference, I knew I was going to have to change a couple of shots in the middle, animating them from scratch. Watching to keep a realistic motion, I used Ryan Doyle’s Parkour Roll Tutorial for the second shot.
So let me just put a little bit about animating a shot. As you can see from the process video above, I have a rough blocked playblast, then an inbetween blocked playblast, and then the final video. So that’s three stages, right? Simple.
No.
More phases are needed, more than I have added into the video, so lets have a look at that.
- Reference – Already talked about that. I had it prepared and I could go through frame by frame.
- Environment – Already mentioned this. It was a rough proxy, but enough to give my character something to work with.
- Shot Layout – Boom! I have a camera and a person in my scene. Where the heck do they go? This phase is all about getting the shot composition correct and typically has a handful of rough poses set to the correct timing throughout the shot, as denoted by the reference or animatic. I did this for every shot before I moved onto the next phase.
- Blocked Pass – now comes the fun part! Animating and laying out those key acting points. Those important poses that tell the story in it’s most basic yet true form. It is important (for me, anyway) to have the keys set to clamped and stepped, and to key every controller for every pose. This will give a clear sense of the poses and timing, and as such, you need to make sure your timing is solid. This phase is the real skeleton of the piece, the foundation on which the rest of the animation is built. If you don’t have your timings down now, sort it out! If your poses don’t sell the action, pose and pose again until it does!
- Inbetween Pass – leave nothing to chance. Hear that? LEAVE NOTHING TO CHANCE! You want the character to move a specific way between one pose and the other? Key it! Chances are, if you spline your keys at the blocked phase, your animation will feel like it floats. spend some time keying the transitions. No, not just keying, but fully posing. The keys are the best tool you have to maintain full control over an animation.
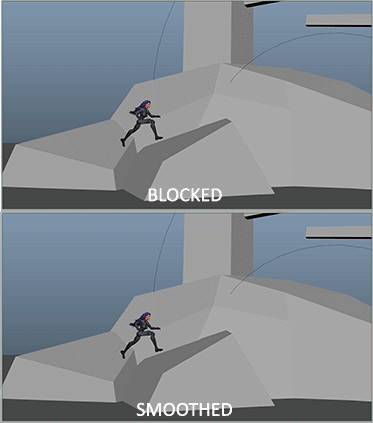
- Smooth Pass – What happens when you take all of your nice and neat stepped keys and simply smooth them out? Answer? Not what you would expect!
 So many times have I animated my blocking phase to look sweet, only to discover that it looks very wrong when smoothed out. As such you are going to have to go into the graph editor and tweak your keys. At this point I wouldn’t be worried about regular keying, but more about the motion. Smooth it out as best you can. At this point you get to really work in offsetting animation to give more follow-through or secondary motion to your animation.
There are a couple of other tricks I adopted during animation to help get the feel I want. For instance, I put reference curves in place to help get a nice arc into some of the jumps, and then used motion trails to make sure I was fitting my animation as close to those arcs as I needed.
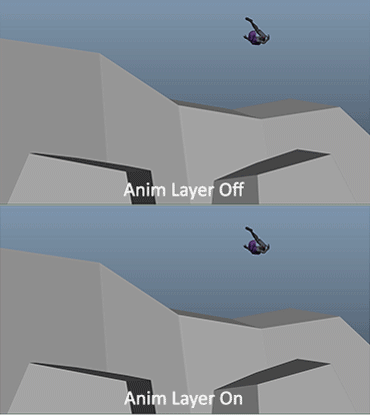
I also used animation layers to amend bits I thought just didn’t worked. In the below example I changed my mind about how her legs should be move during the jump, and used an animation layer to adjust the poses.
With the animation at a point I was happy with, it was time to bring it over to the Unreal Engine. Though I work with UE4 as part of my day job, the majority of my understanding of the games engine is importing animation assets, blend spaces and montages and the like.
I had dabbled with set dressing and Sequencer only once before. Check out Part Two for more on that!
Cheers for reading guys, and I hope you enjoy the animation!


3 thoughts on “LOL Cinematic Animation Exercise Part 1”